This is the whole process of how I created my Big daddy figure. You can scroll down and look through the photos or if you click on the first photo the gallery will open up and you can read the captions of exactly what I did on each image.
This is the start of all things great. The 7″ Kidrobot Munny standing on two tubes to rough out the size that the figure will be!
A close up of the drill seen in previous photo. I found this accessory in my box of random vinyl and thought it would be good to use as a guide for the drill blades. I then sculpted the blades between the raised edges of the vinyl.
This is the styrene circle that I used to create the locking wheel on the tank!
Adding the beams inside of the wheel with quarter round styrene strips
I cut the end off the drill to shorten the vinyl to fit in with the scale of the figure. This was then filled with foil and covered with super sculpey.
Here I filled in the face of the Munny to remove the curve of the nose and have it straight
I had to raise the neck joint up in order to have the face looking forward rather than down.
My work station of organised chaos
Here is the start of back tank. Using different size styrene tubes and some scrap vinyl I mocked up the main exhaust/pipe coming out.
The drill wasn’t looking big enough from my previous tries so I made them thicker and more pointed.
Some more scrap vinyl that seemed to fit really well as extra leg additions to raise it to the size that I need.
After looking at multiple reference photos it seems that the top of the tank was flat with multiple extrusions
Working out how to get the blade of the drill to loop and overlap
A quick roughed out sculpt of the drill blade to get the idea of placement
The smoothed out sculpt of the drill head. I made sure to leave a few dents and misshaped edges to give the impression of a worn out used drill head
I started to fill in the rear of the body to create the smooth curve that you see on Big Daddy. I used foil to fill out and thin layers of super sculpey to cover and blend
A quick prime of the drill head
I made the piping for the tank using styrene tubing, heating with an alcohol lamp and bending to shape
adding half circle styrene strips to the top of the tubes to give them a lip
multiple parts that I am working on
Here I started to create the boots, I cut up some scraps on vinyl into the shape of the boot and used the ears that I previously cut of the Munny to create the toe section.
Still filling and smoothing to get the curve of the back right
After creating the piping I used my dremel to cut holes into the vinyl and attached all together
So much vinyl!
I added the second tubes to the side of the tank
Here I added a small plate to the bottom of the tube so that the styrene pipe would slide in snug and hold the tube up
This is the size of the disk needed to achieve this
Using callipers I measured the circle so that I could re create the same one for the top
both sides now have panels
I decided that It would come in very useful to make a stencil of the circle sizes needed for the tubes.
I found that using piercing tools to remove captive rings come in very handy for holding pieces tight while glue is drying
Here is the panel shaped and sanded for the very front of the figure
I then used the alcohol torch to heat the styrene and curve to shape
I added the extrusions in the pipe using small strips on styrene glued onto the tubing. I then used a very fine jewellers diamond file to file in two slight indentations into the top extrusion.
I added a lip around the from panel and glued
Here I cut 1mm styrene rod into small sections for rivets
I then added the rivets onto the front panel
I starting making a belt to go either side of the figure. I did this by cutting a strip of styrene sheet and then drawing a line directly through the middle. I then divided it up drilled holes in the centre of each cross.
This is the end result of the two belt pieces
All of the styrene bits that i am currently working on
lots of filling to do to get the shape the way I want it.
With the drill head smoothed out I attached a twisted wire to the end to hold it onto the arm
all of the pipes assembled and added to the tank
I rounded off the end of the drill so that I could add the next pieces of the arm.
I used a metal ring and created a bore drill head using a strip of styrene and then glued smaller strips at an angle all the way around.
For the hydraulic pipes I used two different sizes of styrene tube and cut little sections with longer pieces on the end
I put these two together with centre panels and used glued rivets to the middle and ends.
I used a piece of pvc pipe and pinned the hydraulic section to the top
For the arms I used some more scrap vinyl that i had laying around and cut and pinned the shoulder so that it would fit onto the body.
These holes will later be filled so that the pins can not be seen
A quick prime of the bore drill head and tank
A bit of model filler in the gaps so that you can not see the pins
I drilled through the rivet so that I could pin through it and fill in to cover the pins.
both sides of the hydraulic pipes completed
Drill added to the arm
A quick look to see how the arm would look on the body
After many tries to get the dome on the front looking right with both styrene and clay I was out shopping and found this tea bell and instantly knew it would be perfect for the dome.
I disassembled the bell and removed the base
Then using a Dremel and a sanding end I took of most of the paint.
With a little sculpey I stuck dome to the front to see how it would look. I also textured a piece of sculpey and placed inside of the arm to represent the fabric of the suit
I masked off the metal ring so that when I primed it didn’t get painted
A quick coat of Wilkinsons grey primer and removed the masking tape.
I started to paint the drill head using Humbrol acrylic gun metal silver. This too multiple coats to cover well.
I painted army green onto the fabric section and will add washes in later on
Using 3 different sizes of styrene tubes I made a telescopic look to the bottom of the exhaust tube.
I added the end of the tank on where it will attach to the back of the figure
I filled the edge with a thick section of milliput to look like a weld seam
With all the bars and hoops attached I can start to paint the whole piece
I made sure to add some dents and bits into the hoops to make it look used and aged
Washes and general grime added to the edges
Brown washes and rust dripping down the bars
A quick mockup of the shoes legs and body attached
I added in the metal beam around the arm using one wide and two smaller strips of styrene
Time to cut the hole out of the back using a dremel for the tank to slot into
With the tank and arm painted I assembled quick to see how the all look attached.
I started to fill the inside of the shoes with foil and then layered with milliput
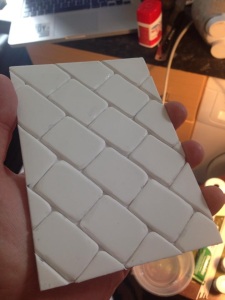
I wanted to create a small base for the finished figure to stand on. For this I used two sheets of 2mm styrene and cut to the same size that I needed. I then cut the top sheet into 1.5 inch pieces running at a diagonal angle. I numbered these so that they would fit back in the correct places later on.
I scribbled the edges that were to be kept sharp and square and then used the sanding tip of my dremel too smooth out the edges and curve the corners.
Once complete I sanded off all of the ink and glued to the bottom sheet.
I decided to make a little adam syringe to go on the base, for this is used several different sizes of styrene and a clear piece of plastic for the glass tube. I then filled this with glued and mixed in some red paint using a cocktail stick.
Painted and next to a 2 pence piece for size comparison.
With most of the shoe filled it was time to start adding the straps and laces. I made these using thing strips of styrene going into little cuts of tubes.
Added the buckle on the side and now ready for cleanup and some paint
This is becoming a beast!! The arm supports the front and the tank supports the back meaning that it stands on its own without support.
Adding a few washes and some dry brushing.
Cheeky little prime
sanding down but making sure to leave some bumps and dents in to look like metal.
Stock up time!! citadel and humbrol bits and bobs!!
Primed the cobblestone base with a airbrushed layer of Citadel’s imperial primer.
A layer over the black of a dark grey.
A lighter layer of grey and white towards the bottom edges. A few quick washes of Nuln Oil in the gaps and it is complete
A layer of airbrushed primer over the munny figure
I started on the hand for the figure using wire to create an armature. I then covered this in super sculpey.
The height of this all assembled will come in about 12.5 inches tall.
I added all of the styrene panels that I made earlier and pinned them onto the front of the figure as well as the ring shown in the previous photo.
First layer of gold on the body. Plus a little bent metal plate ontop of the figure.
I remade the belt that I previously shown and made it long so that it would completely wrap around the body
I then pinned it on to the body
and then….. It got knocked off the table
After two part epoxy glue, some model filler, sandpaper and files it was fixed.
As the boot was brown and the buckle was silver, so I used Humbrol’s Maskol to cover the parts that I didn’t want to be painted.
Maskol is a thin liquid that can be painted on with a regular brush and then when it dries it turns to a flexible rubber that after the base coat has been painted can be removed by just picking and pulling off. It works very well.
Using milliput I filled in the legs to show the fabric of the suit.
I then added the panels around the legs using different sizes of styrene.
Both boots done and ready for some paint
Glued wire in to the leg for support when It will be attached to the body
Added in rivets all around the face plate using thick styrene rods.
Legs attached to the base
Arms and tank attached temporarily
This is the shot from the front of it all assembled before all of the wire and plates and finishing touches.
Big daddy sat in his box ready for his spray tan
These are the lenses for the front dome. They are hand sanded from styrene sheet and a ring of tubing added as well as two cut offs from styrene rods for rivets. I needed 8 identical lenses.
Once finished I glued them on to the front dome and painted maskol inside. This dome is attached to the base using magnets glued inside. It means I can remove it to paint the inside without having to worry about gluing it on.
This is the first of many pieces of the cage that needed to be added. I drilled into the head either end and then used small sections of hollow styrene to fit the rods into.
For the arm panels I cut a strip and a panel of styrene sheet and glued the strip on its side around the panel. I then added rivets all the way around. I also added more of the cage bars and made connectors for it using two small cuts of tubing. I also added a little strip of milliput around the back for the tank to sit into.
I drilled holes into the panel for the arm to fit into.
Next to a ruler the figure measures approx 12″
Glued all of the rods into the central holders. Also added the two longer lenses to the very bottom of the dome.
All of the cage complete and connected to the arm plate
Hand attached to the arm using wire but also not glued so that it can be rotated to any angled desired.
Big daddy certainly is big! With I masked off the legs and the shoulder so that I could paint it without overspray.
front angle
top angle
Airbrushed gold and green and started adding in silver to the panels around arms and legs.
I also painted the glove as well as the boots and started to add washes in.
Started adding Nuln Oil washes to the metal and grey washes the the gold to bring down the colour.
More washes and silver with highlights and other detail.
An in hand photo of the almost complete Big Daddy to show scale.
I painted the lenses yellow which in game indicates awareness but indifference to his environment, rather than green which means hypnotised and calm or red which indicates rage. I think yellow is very fitting for the whole colour scheme.
More washes to dull down the colour and adding in dry brushing and stippling of browns and whites.
For the figure to stand straight up it needed an extra 4mm at the front of the shoes, but rather than add it directly to the shoes I decided that I wanted the bouncer to stand on an iron bar. I made this using styrene tubing and slotted a few pieces together. I then added a little of Citadel’s Typhus corrosion to the edges to show a little rust. I then painted these brown and dry brushed a little ryza rust onto it.
Finished!!!! Big daddy display on his base with dynamic lighting and a blue light above to cast shadows across the figure.
For a lighter photo to show detail I displayed the figure in front of a garden fire to give the background some detail and have a fitting surrounding.
This is the final photo. I like how the photo has the chimney in the background and shows all of the details on the figure.
A quick shot in front of a white background.
If you have made it down to here then I thank you VERY much for viewing and reading all of this. Please leave comments on feedback of whether I should keep up with this and what I can do to improve.
I can be contacted on Facebook, Instagram or via email at e.morgan93@live.com
Hi, and welcome to my blog where from now on I will be posting photos of the whole process of my custom figures. First up will be my Bioshock Big Daddy custom that I have just completed. So be sure to keep and eye out for that. But for now here are a few of my previous completed pieces:
Custom figure of Carl from the film UP. Sculpted using Super Sculpey on a 4″ Kidrobot Munny base, painted using acrylic paint.Custom figure of Russell from the film UP. Sculpted using Super Sculpey on a 4″ Kidrobot Munny base, painted using acrylic paint.Custom of a 64 colors Marshall figure painted using acrylic paint and sculpted horns.
I can be contacted at e.morgan93@live.com or onFacebook.
The rest of my previous work can be found on my Flickrand Instagram as well as WIPS of my current work.